Total Pageviews

Sunday, October 20, 2013

Dutch Babies and Poached Pears, oh my!


It isn't quite a souffle, not yet a popover, beyond a pancake
and still couldn't be called a quiche. Known as a 'Dutch Baby'
this is a wonderful treat made with but a few ingredients, easy
to whip up in no time, though if the batter is refrigerated
overnight, even better.

Served with poached pears, this was a hit with my husband,
parents, and even our dogs!

Though it does not rise as high as the eggy treats mentioned
previously, the inflation it does achieve is quickly deflated once it
is removed from the oven. A sprinkle of powdered sugar and
freshly poached pears, divine!


Recipe courtesy of my favorite Leite's Culinaria.
If you haven't experienced the joy of Leite's, I encourage you to visit.
Not only is the crew a wonderful group of people, their sense of humor are
fabulous, they give credit where credit is due and always provide the
source of their tested, tried and true recipes, unlike some who change
an ingredient or two and claim it as their own. I can't sing their
praises enough.

For the Dutch Baby Recipe, CLICK HERE

Tuesday, October 8, 2013

Chocolate Sour Cream Bundt Cake


Another recipe to keep, from none other than Leite's Culinaria

Chocolate Sour Cream Bundt Cake

Remember the glorious cake made with the recipe from the
side of a metal can of Hershey's cocoa way, way back when?
You thought that cake was the be-all, end-all of the
time, right? Well, hold on to your cookbooks, folks.
This one is going to knock your socks off.
Everything in moderation, right?

As I type this, I am licking the remaining crumbs from
my lips. I would probably lick my plate, too, if my husband
were not in the room.

Though we typically do not indulge in such decadent-looking
cakes, it was well worth the risk. My only regret is not paying heed to the numerous posts from others to heavily butter the pan. Looking like a guaranteed flunk in Home Economics class, I pieced it back together, the glorious glaze hiding the fact that I braved a new pan, knowing better all the while.

Instead of using plain water, I added half a cup of coffee, half a cup of water, and a teaspoon of Medaglia D'Oro instant espresso.

I did butter the pan, but not nearly enough, though this fact was dismissed quickly when I found myself eating the deep, dark, delicious Humpty Dumpty bits that stuck to the pan.

Once a slice was served, my culinary misdeed was forgiven and forgotten. I will definitely make this cake again. The moistness, the flavor. Hubby defined this as "The perfect, perfect chocolate cake." Oh, and before I forget, this cake should be refrigerated. I know what you're thinking, that your cake will get dry and hard. Ah, quite the contrary. It only seems to get better after a night in the 'fridge!

For the recipe, please visit Leite's Chocolate Sour Cream Bundt Cake

Grab a cup of coffee. You'll be there a while.

Sunday, October 6, 2013

And so begins the twined rag rug...


This afternoon, October 6, 2013, my husband completed
construction of a 27" x 36" red oak loom for me. The
loom will be used for twining a rag rug, which is a
very old, yet still very unique method of weaving
cloth into itself, forming a thick mat, or rug.

Years ago, I found myself enamored by rag rugs, yet
did not manage to get around to actually making one
until I happened upon an 'all you can stuff into a
bag for one price' sale at a local thrift store.
Making my way around the store, I found four pot
holders that were made using the reminiscent square
frame with pegs, reminding me of weaving rugs.


Although my loom of long ago was metal, and painted red, if I remember
correctly, today's looms are made of plastic. Because I had such fond
memories of making similar pads as a child, I bought the four pads during
the sale. Making my way around the store, a giant double-rack display
of T-shirts caught my eye. All the shirts I could fit into a bag? Potholders?
Looms? It was time to make a rug!

For fun, I bought a children's weaving loom / pot holder making kit at a local box
store, made a pot holder and giggled. After the pad was finished, the wheels began to
turn. When I arrived home with my bounty of T-shirts, I quickly pulled out all of my
rag rug books collected over the years, surfed the internet for days, and daydreamed
of rugs.

And then I found it.

Nancy Vandenberg's blog - Wyoming Breezes.
Nancy is an amazing woman with a warm heart and enough talent to shame you under the table
for trying. She is quite a twiner, and in fact, has the most amazing black-and-white photo
of her own mother twining genuine rag rugs years ago. I fell in love with her site, and once
I found her instructions for making my own loom, there was no turning back. I began to stalk
her every wonderful blog post with admiration. With Nancy as my inspiration, here goes...

Stay tuned for updates and hopefully, completion.


Sunday, September 22, 2013

Fresh Autumn Apple Tart

As Autumn approaches, leaves begin to change colors, cooler weather is on the way, and apple harvesting season arrives!

In the spirit of the season, it is time for an apple tart! This is such an easy tart, without a great deal of hassle, yet one that will yield delicious results, not to mention a beautiful appearance.

When an apple variety by the name of Jazz arrived in our local grocery store, I knew what we would be having with our morning coffee - and soon! A Jazz is a cross between a Royal Gala and a Braeburn apple. The result is a sweet and crispy apple that holds shape very well, whether eaten fresh or even baked.

Recipe courtesy of Enza of New Zealand.

CLICK HERE FOR THE RECIPE

Monday, September 2, 2013

Roasted Garlic and OIive Pasta Sauce

A simple sauce with a lot of flavor, this recipe will create six pint jars of tangy sauce that can be used in so many ways. A great pot of sauce to make when you might have extra company coming for dinner.

This recipe was found in a little cook booklet put out by a company named Market Day. I just happened to stop at a second hand store one day, and found they were having an 'all the books you can fit into a bag' sale. Two bucks, and I walked away with a great wealth of recipes to try!

Though our garden is just about spent for the year, and fresh tomatoes would have been best, canned tomatoes work just fine for this recipe.

Just a few other ingredients, and two heads of garlic, and you're good to go! Come along, let's make the sauce!


Recipe from a little cook booklet by Market Day - with amended options for the roasting schedule.
Shown with added mushrooms and freshly ground black pepper.


2 heads of garlic (full heads, not single cloves)
1 teaspoon of extra virgin olive oil
3  28-ounce cans of peeled, whole tomatoes
1  6-ounce can of pitted ripe black olives, drained, diced
1  6-ounce can of tomato paste
1 tablespoon of dried basil leaves
1 teaspoon of red pepper flakes

After removing most of the paper husk, keeping the cloves intact, cut the tops from two heads of garlic to expose the cloves. Don't fret if your garlic has tiny green sprouts (known as 'germs') as they can be easily removed after roasting.

Place each garlic head on a square of aluminum foil, drizzle with olive oil, and wrap foil around the garlic.You may roast the heads at 350 degrees for about an hour, or 450 for about half an hour. After roasting, remove from oven, open foil packets and allow heads to cool. Squeeze heads to force cloves from the husk. Mash cloves with a fork.


Drain canned tomato juice into a large pot. (This is an opportunity to use your Dutch oven.) :-) Dice remaining tomatoes, removing any skin or blossom ends, add diced tomatoes to the pot. Add the mashed garlic, olives, tomato paste, basil and red pepper flakes. Bring to a low boil, reduce heat and simmer 5 minutes.

Sauce can be stored in a container with a tight-fitting lid for one week, or frozen for one month. May also be canned, recipe provides for slightly more than six pint jars of sauce.

Thursday, August 29, 2013

Jerk-Style Chicken Kebabs

Kebab. Ka-bob. Shish Ka-bob. Kedap. Kabab. No matter what you call them, they are great, and there is no better time than a nice, long weekend to make them happen.

There is nothing set in stone for making these delightful, colorful, Middle Eastern treats that are often served on a stick. Clean out the refrigerator, and you'll likely have the ingredients
necessary for a fabulous batch of kebabs, which are quick and easy to prepare in no time.

Pork, beef, chicken, fish, seafood, vegetables, fruit, so many options, so little time!

Grab a few skewers and come with me, we're making Jerk-Style Chicken Kebabs! For a step-by-step page, visit this tutorial on Instructables!


Marinade recipe courtesy of Cooking Light. 

Friday, August 23, 2013

Three Pepper and Pasta Soup

Three different peppers give this soup a kick, and with the addition of plenty of oregano, a good dose of extra virgin olive oil, and a quick glance in the produce drawer of your refrigerator, you should be able to toss together a soup that calls for seconds.

 My husband is one of those carnivore types, so I make a good number of little meatballs, seasoned with a dash of oregano and a sprinkle of Cavender's Greek Seasoning. If you are not currently using this fabulous seasoning, your life is missing something.

Just a few basics, like a carton of broth, an onion, and a can of tomatoes will get you started. Though the soup itself is delicious and filling, hubby and I put everything on a bed of pasta. Elbow macaroni, tiny shells, Ditalini, even barley. There are so many options!


  • Pasta, if desired. Cook separately, coat lightly with olive oil and set aside. Time the cooking of your pasta so it is coming out of the pot hot when your soup is finished.

  • Meatballs or cubes of chicken if desired, cooked and set aside

  • Extra virgin olive oil
  • 1 onion
  • 2-3 cloves of garlic - minced
  • 2-3 stalks of celery, diced
  • 2-3 jalapenos, stems removed, veined, seeded, diced)
  • 1 or 2 orange or red bell peppers, stems removed, veined, seeded, diced)
  • 32 ounce carton of broth (I use chicken broth)
  • 1  28-ounce can of tomatoes. Do not drain. Use diced, or dice them if whole.
  • 4 ounce jar of pimentos, drained
  • Fresh oregano and / or dried oregano

Over medium heat, saute onions and garlic in a large pot with a heavy bottom. Add bell peppers and jalapenos, stirring well, allow to saute for about four minutes. Add celery, cook a few minutes longer. Add broth and tomatoes, stir well. Bring to a boil, reduce heat and simmer until vegetables are tender. Add drained pimentos. If you choose to add cooked meat, you may add it now.

In a small saucepan, heat enough olive oil to coat several tablespoons of fresh oregano. I actually prefer to add both fresh and dried oregano to the olive oil. Saute the oil and oregano until the fresh oregano wilts and the kitchen is beginning to smell divine.

Pour the olive oil and oregano into the soup. Stir well. Serve alone, with bread, or over pasta.     

Don't be afraid to get creative. Use vegetable broth instead of chicken broth. Add sliced zucchini.
Use a red and an orange bell pepper.

Bon appetit!


Tuesday, August 20, 2013

Bean and Bacon (optional) Soup

I know what you're thinking, but no. Unfortunately, this is not the recipe for that famous red and white can.

It is, however, a quick and easy recipe that can be amended with ease to your tastes. Add bacon. Forget the bacon. Add carrots. Maybe celery. Add a bit of vegetable or chicken broth if you desire.

Though I'm not a big fan of cannellini beans, there were two cans in our pantry, and it seemed a shame to let them sit there going to waste. So, we toasted the remainder of a three-day old cornbread, tossed up a pot of soup, and we're full.

Scan your cupboards for other ingredients such as corn, even green chilies would taste fine in this multi-tasking soup.

Recipe courtesy of Cooking Light.

3 slices of bacon, chopped (optional for vegetarians)
1 cup of chopped onion
1 Tablespoon of chili powder
1 1/2 teaspoons of dry mustard powder
1 1/2 cups of water
1 Tablespoon of dark molasses
1 Tablespoon of red wine vinegar
2 15-ounce cans of cannellini beans, or other white beans - DRAINED
1 14.5-ounce can of diced tomatoes with onions and garlic - UNDRAINED

 If including bacon, cook over medium-high heat until it is crisp. Remove the bacon from the pan, set aside. Reserve 2 teaspoons of bacon drippings in a sauce pan.

If going vegetarian, use 2-3 teaspoons of extra virgin olive oil.

Over medium-high heat, combine onions in oil or drippings. Add chili powder and dry mustard, stir well, saute for three minutes. Stir in bacon and all remaining ingredients, bring to a boil. Reduce heat, simmer for seven minutes.

Remove the pan from heat. The original recipe calls for partially mashing some of the beans, but I did not feel this was necessary. To each his or her own.

Bon appetit!

Sunday, August 18, 2013

Grilled Asparagus with toasted sesame seeds

Summer time barbeques are the perfect opportunity for inclusion of vegetables. Even if you don't own an outdoor grill, an indoor electric grill is perfectly acceptable for grilling these delicious spears!

Though the original recipe, courtesy of Cooking Light, featured larger spears of asparagus threaded onto wooden skewers for ease of turning while grilling, I used what I had on hand. In this case, our smaller asparagus, sans the skewers, turned out just fine. But if you have them, thread a few sticks through the top and bottom of a row to make a 'raft'. They are so much easier to flip all at once when one side has been grilled.

Use fresh, beautiful green (or white if you are lucky enough to have them) spears that snap when the ends are broken off. Fresh asparagus is truly the best!

  • 16 asparagus spears (the thicker, the better)
  • 1 Tablespoon of low-sodium soy sauce (trust me on this one, go low sodium)
  • 1 teaspoon of dark sesame oil
  • 1 clove of garlic, minced well
  • 2 teaspoons of toasted sesame seeds
  • 1/4 teaspoon freshly ground black pepper

Prepare an outdoor, or an indoor electric grill to high heat.

Toast sesame seeds with salt and pepper. (Think toaster oven.) Set aside. 

Combine soy sauce, minced garlic and sesame oil in a large, shallow container. Place the spears into the mix, and move them around to coat them. You may also brush the mix onto the spears. Grill approximately three minutes, turn over, grill for three more minutes. 

Remove from the grill, sprinkle with the sesame seed, salt and pepper combination.
Serve immediately.


Marinated Tomatoes

As Summer nears an end, one should always reserve a few tomatoes for marinating. Quick and easy to fix, they pop into the refrigerator in no time, marinating while the rest of dinner is prepared.

Originally posted in Country Magazine, I swear this is the same recipe used by a former co-worker's mother for a company dinner. The tomatoes didn't last long, and everyone complimented Mrs. Crawford's dish, so much so, that she ended up printing the recipe (along with her fabulous cheese ball to which I would later become addicted) for many of the employees.

Grab a few tomatoes from the garden, or head for your local Farmer's Market early for the big ones. A large casserole dish is perfect for the marinating process. Simply cover with plastic wrap in the refrigerator.

  • 3 large fresh tomatoes, sliced on the thick side
  • 1/3 cup extra virgin olive oil
  • 1/4 cup red wine vinegar
  • 1 teaspoon salt (optional use = 1/2 tsp. or none at all)
  • 1/4 teaspoon freshly ground black pepper
  • 1/2 to 1 garlic clove, finely minced
  • 2 Tablespoons onion, finely minced (make 'em pretty, they will stand out)
  • 1 Tablespoon fresh parsley, finely minced
  •  1 Tablespoon fresh basil, finely minced, or 1 teaspoon dried basil


Place sliced tomatoes in a large dish such as a rectangular casserole dish. Mix all remaining ingredients in a container with a lid, cover and mix well. Pour over tomato slices, cover with plastic wrap and refrigerate for several hours. 

Print several recipe cards. They are going to ask for them. Bon appetit!

Sunday, August 4, 2013

White Chicken Chili


Though this recipe is a mere twist on an old pot of white beans, it is a hearty, simple, and delicious version updated by the Bush company. Think Duke and Jay Bush...

Quick to make, and easily adapted to your preferences, it is a forgiving recipe that awaits, and even begs changes.

If this, or a similar white bean chili recipe is not already in your folder, file box or cookbook, it should be!

Try adding cooked barley. Or zucchini. Or jalapenos. Corn or black beans. Perhaps a clove or two of garlic. Fennel seeds. Oregano flakes. A dash of chili powder. Black pepper, red pepper flakes. SO many options, and they are all certain to taste wonderful in this recipe!


1 Tablespoon of olive oil
1 medium onion, diced or chopped
1 can of chopped green chilies, drained (4 ounces)
3 Tablespoons of all-purpose flour
2 teaspoons of ground cumin
2  15.8 ounce cans of Bush's Great Northern White or Navy beans
1  14 ounce can of chicken broth
1  1/2 cups of diced, cooked chicken

Examples of optional toppings:
Shredded cheese
Sour Cream
Salsa

In a medium-sized sauce pot or small Dutch oven, cook the diced onion
in olive oil until transparent - about four minutes. Add drained green chilies, flour
and cumin, cook and stir for two minutes. Add chicken broth and beans
(do not drain the beans) and bring to a boil, gently stirring occasionally.

Reduce heat, simmer for about ten minutes, and it will thicken up. Add
chicken, allow to heat once more.


Friday, July 19, 2013

Spinach and Ricotta-Stuffed Shells


There is no need to be intimidated by such a recipe. You can do it!


When I served this dish to my significant other, I was expecting the same routine. He would salt the heck out of it, eat it and life would go on. What I didn't expect was all the raving. From another room, I could hear his fork clanging against the plate over and over. The compliments were bountiful, and I was beaming with pride. Stuffed shells may now be marked off the
bucket list. Success!


For a step-by-step tutorial, please visit MY INSTRUCTABLE


2 cups Multi-Purpose Marinara
Cooking spray
2 1/2 cups part skim ricotta cheese
1/2 cup of freshly grated Parmesan cheese
1/2 teaspoon of onion powder
1/2 teaspoon of dried oregano
1/4 teaspoon of salt
1/4 teaspoon of freshly ground black pepper
1 10 ounce package of frozen spinach - thawed, drained and squeezed dry
1 large egg yolk
1 clove of garlic, minced or squeezed through a garlic press
24 jumbo pasta shells - jumbo. Should be cooked prior to assembling this dish.


Wednesday, July 17, 2013

Multi-Purpose Marinara Sauce

Oh, the magic of the smells floating through your house when a big pot of this wonderful Marinara sauce is on the stove top.

The longer it simmers, the more intense the flavor, and the thicker it becomes, making it a wonderful sauce in that you decide what the end result will be. Marinara sauce is so versatile. Dip mozzarella sticks into a hot pool of it, and you'll melt like the cheese that would taste great on top of it.

Pour it over a bed of pasta, doll it up further for use as a pizza sauce, there are so many things you can do with it.

Easily adapted if you wish to vary from the given recipe, so please, by all means, have fun with it. Add capers, add mushrooms, olives if you desire. Add more onion, less onion,
no onion. This is your sauce. Let's get started!


For a detailed, step-by-step tutorial with full instructions and a lot of pictures, please
see my Instructable: MULTI-PURPOSE MARINARA SAUCE.

  • 3 Tablespoons of olive oil
  • 3 cups of chopped yellow onion (usually about 3 medium-ish onions)
  • 3 Tablespoons of minced / diced garlic
  • 1 Tablespoon of sugar
  • 2 teaspoons of salt
  • 2 teaspoons of dried basil
  • 1 1/2 teaspoons of dried oregano
  • 1 teaspoon of dried thyme
  • 1 teaspoon freshly ground black pepper
  • 1/2 teaspoon of fennel seeds (crushed, if you prefer)
  • 2 Tablespoons of balsamic vinegar (not apple cider, not white)
  • 2 cups of fat-free, less-sodium chicken broth (no, you can't tell, and it's better for you)
  • 3 28-ounce cans of crushed tomatoes (you may use salt free if you wish to reduce sodium) 


Thursday, July 11, 2013

Easy Four Day Refrigerator Pickles

If you find yourself with a bounty of little cucumbers, make pickles! So easy to toss together, put into the refrigerator, and then in four days, enjoy. From the 2008 Cooking Light Annual Recipes book, page 217.

6 cups of thinly sliced pickling cucumbers (about two pounds)
2 cups white onion, sliced thin
1 1/2 cups of white vinegar
3/4 cup sugar
3/4 teaspoon salt
1/2 teaspoon of mustard seeds
1/2 teaspoon of celery seeds
1/2 teaspoon of ground turmeric
1/2 teaspoon of crushed red pepper
1/4 teaspoon of black pepper, freshly ground
4 garlic cloves, sliced very thin


For even more details and photos, visit my step-by-step tutorial:

http://www.instructables.com/id/Easy-Refrigerator-Pickles/ 

In a large glass bowl, layer three cups of sliced cucumbers.
Top with one cup of sliced onions.
Repeat.

In a small saucepan, combine 1 and 1/2 cups of white vinegar.
Stir in the remaining eight ingredients, whisk or stir well.
Bring to a boil, allow to cook for one minute.

Pour over the cucumber / onion mixture and allow to cool.
Cover and chill for at least four days.

Yield: 7 cups (serving size = 1/4 cup)

May be stored in the refrigerator for up to one month. If they last that long. 

Wednesday, July 10, 2013

Sweet Rice Pudding (Arroz con Dulce)

From the 2008 Cooking Light Annual Recipe Book:

2 cups of water
1 tablespoon of butter
1/4 teaspoon of salt

1 2" cinnamon stick
1 cup UNcooked Arborio rice (look for NON-GMO)
2-1/2 cups fat-free milk (or 2%)
1/3 cup sugar
2 teaspoons of grated lime rind
1/2 cup golden raisins
1 teaspoon of vanilla extract

Combine first four ingredients in a large saucepan, bring to a boil. Stir in rice. Reduce heat to medium, and cook 10 minutes or until liquid is almost absorbed, stirring occasionally. Remove and discard the cinnamon stick. Stir in milk, sugar and lime rind, bring to a boil over medium heat, stirring frequently.

Reduce heat to medium-low, cook 25 minutes or until mixture thickens and becomes creamy, stirring frequently.

Remove from heat, stir in raisins and vanilla extract.

I do have to say, though, now that it has chilled in the refrigerator, it is very thick. Maybe tomorrow after it has completely chilled, the texture will be a little more uniform. I'm thinking I preferred the consistency of it before it chilled. But it is good!

Wednesday, May 29, 2013

How to Make Lace-like Stepping Stones

For a complete tutorial, but with many more pictures, visit my Instructable!


When I found fifteen square stepping stones buried beneath the soil from a checkerboard garden project of mine from years ago, it reminded me of the wonderful creative things I used to do when I worked at home. The gardens were beautiful, things were in bloom, and weeds were in short supply.

While strolling through a second-hand store, I happened upon a vinyl doily for a mere fifty cents. Meh, I thought. Went home, plopped it on the dining room table and sort of forgot about it. A few mornings later, hubby and I were having coffee at the table. Where I sat, I could see where the plain stepping stones were. My gaze shifted to the doily, then to hubby, and then... a Eureka moment arrived!

Put on your work duds and let's make something nice for the yard!

Step 1: Supplies and materials needed...


Stepping stones - Choose a stone color that is in contrast to your paint color
A lace doily, or better yet, a vinyl / rubber doily (See step 6 for other options)
Outdoor / Exterior Spray paint - You'll want the paint to stand out.
(Choose lighter or darker than your stone)
Outdoor / Exterior Clear spray sealer
A large piece of cardboard. Even poster board will work just fine.
A pen, pencil, heck, even a crayon will work
A pair of scissors or a serrated knife.
A scrub brush
A source of water (bucket of, or garden hose)

One can of spray paint is typically enough to spray six or seven stones. Take into consideration the size of your stone, and the amount of paint required to cover the areas without 'lace'. While paper doilies are available, they would not be a wise choice, as the slightest breeze or even the spray of the paint would move the doily around.

Though most doilies are crocheted, it is easy to find vinyl table covers, place mats and other items to use. Please don't use an heirloom treasure your grandmother made by hand! Be sure to choose one that will give a pleasing result with a lot of coverage. If you have a large project in mind, consider table covers by the yard, which are found in many box stores.

Step 2: Let's go shopping! (Or use what you already have)


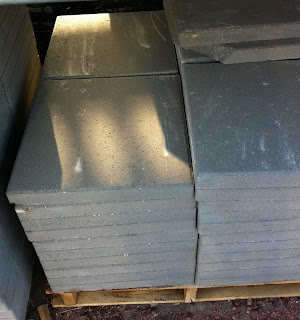
You are not limited to square stepping stones. In fact, if you enjoy working with concrete, you could even make your own, in any shape you desire!

Round stones, square, rectangles and so many other shapes are available in large home improvement centers. Try to choose a stone color that will be in contrast to the paint color you choose. Dark stone, light paint. Light stone, dark paint, and so forth.

You might even consider edging pieces. Lay them on their side, paint, and put into place. :-)

Step 3: Scrub the stones and allow them to dry...


The best weather for this project would be a nice, sunny day, maybe even with a bit of a breeze. You'll likely want to scrub or rinse off your stones to remove any concrete residue that may prevent the paint from adhering properly. Please note, you don't have to purchase a specific scrubbing tool for this, you could use an old hairbrush, a dirty old rag, an old toothbrush or such. And no, not your significant other's toothbrush, even in a moment of anger.

Rinse the stones off well and allow to dry thoroughly.

Don't be impatient. Let them dry.

Step 4: Trim away weeds before placing the stones...


Because this project was completed using items I already had in the garage, afterthought mentioned that weed barrier fabric would have been splendid, but...

We're used to weeds around here, but if you are not, consider laying fabric on the path where you will place your stones. I actually enjoy the more natural look, and not one that is so refined. We do, after all, live in the country.

Trim, yank, pull or do whatever is necessary to clear weeds from the area where your stones will be. Keep in mind, you don't want to fight with things getting in the way when painting. As for the Vinca major shown, take my advice. Don't plant it. We'll talk about that later. Maybe.

An easy way to do this is to place the stones as you wish, then run a weed trimmer over the tops and sides of the stones to clear away any plant growth.

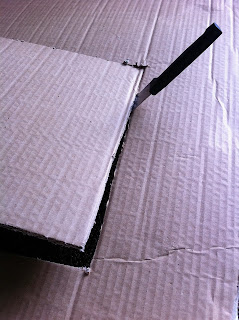
Step 5: Make a painting shield...


If you have a work table available, a small stack of newspapers should suffice to keep the paint off your table.

If you are working directly on the ground, a painting shield may come in handy.

Simply lay one of your stones on top of a large piece of cardboard or poster board, then trace around it with a pencil. Remove the stone and cut the traced shape out of the board. The cardboard should now fit snugly over the stone.

This method allows you to spray only the stone, and not the surrounding materials and plants. It also helps to keep the spray from landing on stones you have already completed if you are working on a walkway that is already set in place.

Step 6: Decide on a doily or a stencil...


As a very devoted fan of the doily, I would like to mention that I don't necessarily approve of the damage and / or destruction caused to crocheted doilies should you choose to go that route. However, if you simply must, try to sacrifice one that is stained heavily, torn, etc. and not a nice one. If hand made, quite a bit of work went into it. Personally, I do not know how to crochet (yet) and am envious of the talent.

If you can't find a vinyl doily, don't fret. There are so many other options! Some of the larger box stores sell lacy plastic or vinyl tablecloths or table runners in rolls or by the yard.

Plastic stencils work great, too, and can often be found in hobby stores in so many shapes, and even alphabet stencils are a thought, too!

Consider using word stencils to spell out one of your favorite short quotes, placing one word on each stone. Or choose a quick and easy project and make three stones with "I Love You" or "Live, Love, Laugh". You have already thought of ideas, haven't you?

Step 7: Paint the stones...


After you have placed your painting shield over the stone, lay your doily of choice on top of the stone and give it a good coating of spray paint. Be sure to focus on the tiny holes, but don't hold the paint too close, or there will be blobs seeping underneath. A light mist around the edge, then the center, then back around again, giving good coverage, but not too heavy.

Allow the paint to dry a bit, then carefully lift the doily out of the way, draping it over something to allow any residual paint to dry on the doily.

Paint each stone, being careful not to step on them until they are completely dry.

Step 8: Paint, dry, then seal the stones.

After you have sprayed the stones with the lace, allow them to thoroughly dry. Using an exterior sealer, spray the tops of the stones to protect the paint finish.

If you have the funds available, opt for a small can of outdoor polyurethane. Your stones will look twice as gorgeous and the paint will last a lot longer, not to mention the cool beading effect rain will have on them.

Step 9: Add mulch for effect...

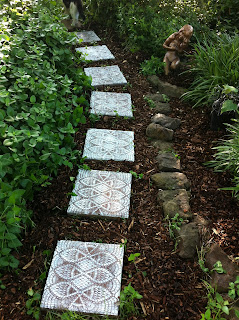
Mulch really does wonders for the garden. Consider adding some around and in between the stones for a wonderful effect!

I chose a nice pine bark nugget, which looks lovely next to the white stones.

Step 10: Before, during and after...

Although the lace stones provide quite a decorative effect, the dark mulch really sets it all off. I cannot wait until the rains come, which will darken the mulch even more, wetting the stones, enhancing the look.

This is a favorite place for our cats to hang out, so now that it is photo-worthy, we'll probably be likely to find one of the stinkers on a stepping stone. In fact, if you look at the top of the photo below, you can see Libbie walking on the stone I have yet to paint. But would she take a moment to pause, posing pretty? Nah.

For those with a keen eye, yes, Libbie is sitting on a stone yet to be painted.

Step 11: And finally...make them glow in the dark!


Oh, but you thought this project was over, yes? Not so. One final idea. Make your stepping stones glow in the dark!

Once your stones are dry to the touch, place the doily back onto the stone in the same location. If you used a doily with a specific pattern and contrasting color paint to the stone, this should be an easy feat.

Spray just as you did before, only this time, spray over the sections that have already been painted. The neat thing about this paint, you can't really see it in the daytime that well.

Come night time, grab a flashlight, charge up the stones and then turn out the lights. Lovely!

I hope you have enjoyed this tutorial, and perhaps garnered a few ideas of your own.

Happy gardening!

Karen