
For a complete step-by-step tutorial with even more pictures, please visit my Beef and Peppers in an Edible Nest - An Instructable!
You won't have to climb trees for this dish, nor will you have to pay thousands of dollars as some people do, actually cooking with, and consuming the nest created by a young bird in the Southeastern Asian region. The bird is known as a Swift, or Swiftlet. The nest is known as Yanwo, constructed with the saliva from a Swiftlet. Yes, I'm serious. People eat bird nests. When the nest is dried, it is valued for culinary use, said to possess medicinal, as well as aphrodisiac qualities. The nest has a gelatinous texture when cooked, and it is often used for soups, very expensive soups.
But we'll skip the Swiftlet spit, and make our own edible nest using your choice of white potatoes, sweet potatoes or even taro root, a bulbous root typically found in the produce section of an Asian supermarket. After frying the nest, it is filled with a delicious beef and pepper stir-fry. Come along, and I'll show you how!

You won't have to climb trees for this dish, nor will you have to pay thousands of dollars as some people do, actually cooking with, and consuming the nest created by a young bird in the Southeastern Asian region. The bird is known as a Swift, or Swiftlet. The nest is known as Yanwo, constructed with the saliva from a Swiftlet. Yes, I'm serious. People eat bird nests. When the nest is dried, it is valued for culinary use, said to possess medicinal, as well as aphrodisiac qualities. The nest has a gelatinous texture when cooked, and it is often used for soups, very expensive soups.
But we'll skip the Swiftlet spit, and make our own edible nest using your choice of white potatoes, sweet potatoes or even taro root, a bulbous root typically found in the produce section of an Asian supermarket. After frying the nest, it is filled with a delicious beef and pepper stir-fry. Come along, and I'll show you how!
Although a few kitchen gadgets are necessary, they are not overly unusual, and are often found in a local store.
SPIDER / STRAINER: - A small, rounded wire basket, typically attached to a bamboo handle, is known as a ‘spider’, or strainer. While you could easily improvise, a second spider is best for making the nest that will contain the beef and peppers. Look for the gadget under key words such as spider, strainer, Asian strainer and such. They are available in different sizes such as 6”, 8” and even larger, depending on what size nest you would like to make.
WOK: - A wok, or other frying pan which will enable heating of several inches of cooking oil. Be certain the pan is deep enough to cover the basket of the spider, but not so deep that the tool cannot be safely used at an angle.
CHEESE GRATER or MANDOLINE: – You will need something to shred or slice potatoes in a very thin strip. A mandoline (not to be confused with the musical instrument 'mandolin') will produce thicker strands of fries that will form a heartier basket, while a cheese grater with large holes will make a more delicate bedding for the beef and peppers. Please note! Using a potato or yam on a mandoline can be a bit dangerous, as the vegetables are very firm, requiring quite a push on the blade to cut properly. Use extreme caution, and always use the protective vegetable holder that should have been included with your mandoline.
DEEP FRY THERMOMETER: Oil temperature should be 325 degrees (for white potatoes) to 350 degrees (for sweet potatoes or Taro root), depending on which root used for the nest.
OTHER: Paper towels, sharp knife, measuring cups and spoons, fork, scissors, etc.
 Recipe courtesy of Sunset Magazine / Lane Publishing.
SPIDER / STRAINER: - A small, rounded wire basket, typically attached to a bamboo handle, is known as a ‘spider’, or strainer. While you could easily improvise, a second spider is best for making the nest that will contain the beef and peppers. Look for the gadget under key words such as spider, strainer, Asian strainer and such. They are available in different sizes such as 6”, 8” and even larger, depending on what size nest you would like to make.
WOK: - A wok, or other frying pan which will enable heating of several inches of cooking oil. Be certain the pan is deep enough to cover the basket of the spider, but not so deep that the tool cannot be safely used at an angle.
CHEESE GRATER or MANDOLINE: – You will need something to shred or slice potatoes in a very thin strip. A mandoline (not to be confused with the musical instrument 'mandolin') will produce thicker strands of fries that will form a heartier basket, while a cheese grater with large holes will make a more delicate bedding for the beef and peppers. Please note! Using a potato or yam on a mandoline can be a bit dangerous, as the vegetables are very firm, requiring quite a push on the blade to cut properly. Use extreme caution, and always use the protective vegetable holder that should have been included with your mandoline.
DEEP FRY THERMOMETER: Oil temperature should be 325 degrees (for white potatoes) to 350 degrees (for sweet potatoes or Taro root), depending on which root used for the nest.
OTHER: Paper towels, sharp knife, measuring cups and spoons, fork, scissors, etc.
Note: some ingredients are called for more than once, and some are needed for a separate cooking sauce, shown below (*).
Please review the entire recipe before beginning. Handy tip: This meal
tastes even better the next day, a great make-ahead dish! Comes together
easily when everything is measured ahead of time. A great excuse for
those little tiny bowls.
Alterations – absolutely! Add mushrooms. Add onions! Bamboo shoots or water chestnuts!
__________________________________________________________________
Approximately ¾ lb. boneless lean beef such as Flank steak
1 Tablespoon dry sherry (I used Marsala. Who is going to know?)
1 Tablespoon soy sauce
1 Tablespoon water
2 teaspoon salt, divided – (If using full sodium soy sauce, considering omitting)
¼ teaspoon sugar
2 teaspoons of corn starch
Salad oil / cooking oil / vegetable oil
__________________________________________________________________
*Cooking sauce – Combine 1 Tbl. soy sauce, 1 Tbl. Corn starch, ½ cup chicken broth or water. Stir, set aside for later use, to be added to the beef mixture.
__________________________________________________________________
1 clove of garlic
½ teaspoon of minced ginger
2 green / bell peppers, cut into 1/4” wide strips (By all means, yes, you may use a different color bell pepper, though green is the best choice to pair with the beef, in my opinion.)
Suggested addition – one onion, sliced thinly
Suggested addition - a good dose of chili oil for more flavor
¼ teaspoon salt

Alterations – absolutely! Add mushrooms. Add onions! Bamboo shoots or water chestnuts!
__________________________________________________________________
Approximately ¾ lb. boneless lean beef such as Flank steak
1 Tablespoon dry sherry (I used Marsala. Who is going to know?)
1 Tablespoon soy sauce
1 Tablespoon water
2 teaspoon salt, divided – (If using full sodium soy sauce, considering omitting)
¼ teaspoon sugar
2 teaspoons of corn starch
Salad oil / cooking oil / vegetable oil
__________________________________________________________________
*Cooking sauce – Combine 1 Tbl. soy sauce, 1 Tbl. Corn starch, ½ cup chicken broth or water. Stir, set aside for later use, to be added to the beef mixture.
__________________________________________________________________
1 clove of garlic
½ teaspoon of minced ginger
2 green / bell peppers, cut into 1/4” wide strips (By all means, yes, you may use a different color bell pepper, though green is the best choice to pair with the beef, in my opinion.)
Suggested addition – one onion, sliced thinly
Suggested addition - a good dose of chili oil for more flavor
¼ teaspoon salt
Using a 1/2 pound piece of beef, slice the
beef with the grain into 1 to 1 ½” strips, then cut the strips into
1/8” pieces. Refrigerate the meat while prepping the vegetables and
sauces.
It is helpful to measure out all the little things such as the soy sauces, salt and such, all lined up on the kitchen counter top waiting their turn. When and if you eat at fast food restaurants, save the little plastic condiment cups for prep bowls.
Cut a green / bell pepper in half. Cut the top rounded portion off each pepper half. Remove seeds, pith and parts of the pepper that are not green. You may slice or dice the peppers, though strips make a beautiful statement in the completed dish.Peel a small piece of ginger, then dice into tiny pieces. If you are using an onion, cut it into thin slices.Peel and mince the garlic. Don't be afraid to throw in another clove.
 In a bowl large enough to sufficiently hold the meat after it is cut, combine these ingredients:
It is helpful to measure out all the little things such as the soy sauces, salt and such, all lined up on the kitchen counter top waiting their turn. When and if you eat at fast food restaurants, save the little plastic condiment cups for prep bowls.
Cut a green / bell pepper in half. Cut the top rounded portion off each pepper half. Remove seeds, pith and parts of the pepper that are not green. You may slice or dice the peppers, though strips make a beautiful statement in the completed dish.Peel a small piece of ginger, then dice into tiny pieces. If you are using an onion, cut it into thin slices.Peel and mince the garlic. Don't be afraid to throw in another clove.
1
Tablespoon dry sherry, 1 Tablespoon soy sauce, 1 Tablespoon water, ¼
teaspoon salt, ¼ teaspoon sugar, 2 teaspoons of corn starch. Stir well
to mix the corn starch into the sauce. Add the sliced beef, stir to
coat, then add 1 ½ teaspoons of oil. Cover, and allow to marinate for 15
minutes.
If you have not already created the *Cooking Sauce from step 2, do so now, and set aside.
Heat a wok or other large pan over high heat. Add 2 Tablespoons of cooking oil. Once the oil is heated, add garlic and ginger, give it a swirl in the oil, then add the marinated beef. Stir fry for approximately 2 minutes, or until no longer pink on the outside. Remove from pan and set aside.
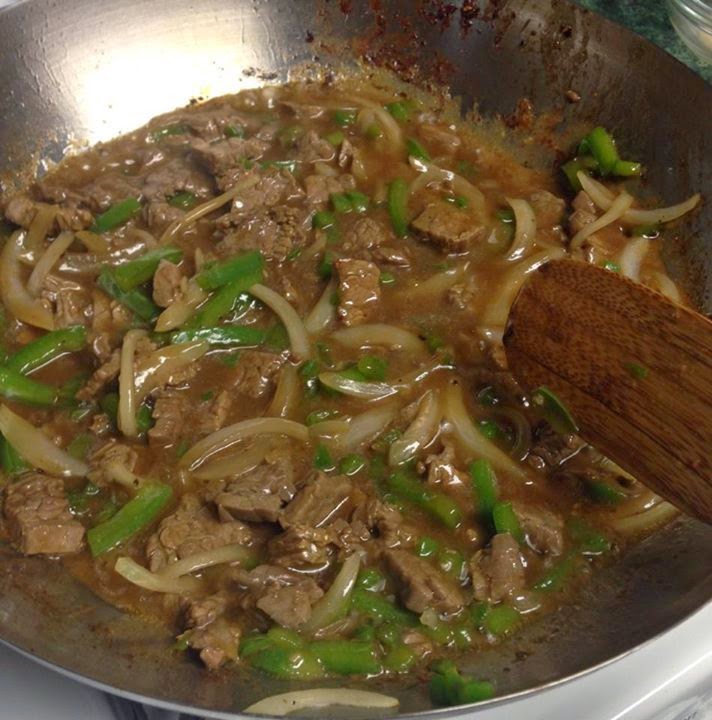
Add 1 Tablespoon of cooking oil to the wok. Add bell pepper, add onions if using, stir fry for just a few moments, then add 1 Tablespoon of water and ¼ teaspoon of salt. Stir, cover, and cook for 1 minute. Add meat back to the pan, then add the *Cooking Sauce. Stir until mixture thickens and is hot throughout.

 Nests can be made ahead of time, though in my opinion, are best when prepared fresh the day of
eating. Much of the prep can be done ahead of time, so if you are
serving this meal to dinner guests, it won’t take long to make fresh
nests. Beef mixture can be made a day ahead as well, which allows the
flavors to come to life.
Nests can be made ahead of time, though in my opinion, are best when prepared fresh the day of
eating. Much of the prep can be done ahead of time, so if you are
serving this meal to dinner guests, it won’t take long to make fresh
nests. Beef mixture can be made a day ahead as well, which allows the
flavors to come to life.
If you have not already created the *Cooking Sauce from step 2, do so now, and set aside.
Heat a wok or other large pan over high heat. Add 2 Tablespoons of cooking oil. Once the oil is heated, add garlic and ginger, give it a swirl in the oil, then add the marinated beef. Stir fry for approximately 2 minutes, or until no longer pink on the outside. Remove from pan and set aside.
Add 1 Tablespoon of cooking oil to the wok. Add bell pepper, add onions if using, stir fry for just a few moments, then add 1 Tablespoon of water and ¼ teaspoon of salt. Stir, cover, and cook for 1 minute. Add meat back to the pan, then add the *Cooking Sauce. Stir until mixture thickens and is hot throughout.
Nests can be made ahead of time, though in my opinion, are best when prepared fresh the day of
eating. Much of the prep can be done ahead of time, so if you are
serving this meal to dinner guests, it won’t take long to make fresh
nests. Beef mixture can be made a day ahead as well, which allows the
flavors to come to life.
2 medium-sized potatoes (Russets are fine) or 2 sweet potatoes, or Taro root
Corn Starch
Frying oil
 On a casual weekend, this dish is very easy to prepare, but if you are
planning a dinner party, or having this during a busy work week,
consider prepping the vegetables ahead of time.
On a casual weekend, this dish is very easy to prepare, but if you are
planning a dinner party, or having this during a busy work week,
consider prepping the vegetables ahead of time.
Simply peel, then shred or slice your choice of root vegetable, rinse well, and fill a glass jar with the shreds. Fill to the top with water and refrigerate until needed. The shreds must be drained and dried with a towel before frying, to avoid grease spatters when the oil and any residual water meet.
 Heat the frying oil to a temperature of 325 degrees if using white
potatoes, or 350 if using Taro root or sweet potatoes. Use a deep fry
thermometer to ensure the oil is at the proper temperature. Peel, then
shred or slice the root of your choice into pieces. Rinse and drain
well, dry the pieces on a very clean towel, paper towel, etc. Try to
remove most of the water before proceeding.
Heat the frying oil to a temperature of 325 degrees if using white
potatoes, or 350 if using Taro root or sweet potatoes. Use a deep fry
thermometer to ensure the oil is at the proper temperature. Peel, then
shred or slice the root of your choice into pieces. Rinse and drain
well, dry the pieces on a very clean towel, paper towel, etc. Try to
remove most of the water before proceeding.
If you are prepping ahead, you can fill a glass container with the pieces, add water, and refrigerate until ready to use, but be certain to drain and pat them dry before frying . Once the pieces have been dried off, sprinkle 1 Tablespoon of corn starch onto them, and mix well. You may add a little more corn starch if needed. This will be the ‘glue’ that binds the fibers of the nest together, so don’t leave it out, or you may end up with a pile of loose hash-brown-looking things.
If you have already begun heating the oil, check the temperature. If you are close to the required degree but not yet ready to cook, move the oil off the stove burner until you are a little closer to frying time. You do not want to experience a hot oil fire or suffer a burn. Be careful!
Lightly spread the ‘fibers’ into the spider / strainer, up the sides, filling the middle, lining the strainer. The nest does not need to be completely filled. Place the second spider on top of the nest, and press down to secure. The two spiders will be held together as the tools are immersed into the hot oil. Trim away any excess potato. Slowly immerse the nest into the oil, continuing to hold the tools together. Keep submerged for approximately 3-4 minutes, or until fried golden brown. If you practice, you can become quite adept at knowing just when to tug on the top spider to loosen it from the other without wrecking the nest.
When frying is complete, lift the spiders out of the oil, allowing excess oil to drain. Move to a paper towel. Use a fork to scrape any segments that may have locked the nest into the spiders. Usually, you can scrape the top spider, and it will release. Then flip the second spider over and scrape the backside of the tool. The nest should fall out. Salt the nest if desired. Drain well.

Corn Starch
Frying oil
On a casual weekend, this dish is very easy to prepare, but if you are
planning a dinner party, or having this during a busy work week,
consider prepping the vegetables ahead of time. Simply peel, then shred or slice your choice of root vegetable, rinse well, and fill a glass jar with the shreds. Fill to the top with water and refrigerate until needed. The shreds must be drained and dried with a towel before frying, to avoid grease spatters when the oil and any residual water meet.
If you are prepping ahead, you can fill a glass container with the pieces, add water, and refrigerate until ready to use, but be certain to drain and pat them dry before frying . Once the pieces have been dried off, sprinkle 1 Tablespoon of corn starch onto them, and mix well. You may add a little more corn starch if needed. This will be the ‘glue’ that binds the fibers of the nest together, so don’t leave it out, or you may end up with a pile of loose hash-brown-looking things.
If you have already begun heating the oil, check the temperature. If you are close to the required degree but not yet ready to cook, move the oil off the stove burner until you are a little closer to frying time. You do not want to experience a hot oil fire or suffer a burn. Be careful!
Lightly spread the ‘fibers’ into the spider / strainer, up the sides, filling the middle, lining the strainer. The nest does not need to be completely filled. Place the second spider on top of the nest, and press down to secure. The two spiders will be held together as the tools are immersed into the hot oil. Trim away any excess potato. Slowly immerse the nest into the oil, continuing to hold the tools together. Keep submerged for approximately 3-4 minutes, or until fried golden brown. If you practice, you can become quite adept at knowing just when to tug on the top spider to loosen it from the other without wrecking the nest.
When frying is complete, lift the spiders out of the oil, allowing excess oil to drain. Move to a paper towel. Use a fork to scrape any segments that may have locked the nest into the spiders. Usually, you can scrape the top spider, and it will release. Then flip the second spider over and scrape the backside of the tool. The nest should fall out. Salt the nest if desired. Drain well.
Place each cooked nest on a plate, and fill with beef and pepper mixture.
Best served when made fresh and hot. If your beef is a bit saucy, you might allow a bit of it to drain through a slotted spoon so as not to make the nests soggy too fast.
Once you make these, you'll be surprised at how easily they come together. The instructions are hopefully written in a clear manner so as not to intimidate anyone. This is easy, and fun, and especially so when your family doesn't know what is coming to the table! Something fun for dinner!
Use your imagination when making them. Here are just a few things you can add or subtract to the mixture:
Bean sprouts
Bamboo shoots
Onions
Mushrooms
Scallions
Water chestnuts
Peanuts
Oyster sauce
Chili oil
Chili peppers
Carrots
Celery slices
What will you add? Bon appetit!
Best served when made fresh and hot. If your beef is a bit saucy, you might allow a bit of it to drain through a slotted spoon so as not to make the nests soggy too fast.
Once you make these, you'll be surprised at how easily they come together. The instructions are hopefully written in a clear manner so as not to intimidate anyone. This is easy, and fun, and especially so when your family doesn't know what is coming to the table! Something fun for dinner!
Use your imagination when making them. Here are just a few things you can add or subtract to the mixture:
Bean sprouts
Bamboo shoots
Onions
Mushrooms
Scallions
Water chestnuts
Peanuts
Oyster sauce
Chili oil
Chili peppers
Carrots
Celery slices
What will you add? Bon appetit!


